Monday, March 25, 2013

Mochai Masala Rice | Field Bean Masla Rice


Channa [Chickpea] Pulao has been on the "to cook" list for long, but since it requires pre-soaking, I almost always forget to get the pre-soaking done and it would get postponed. So on one of those usual chai sipping times when I decide on the lunch menu for the next day, I decided to make channa pulao and rushed immediately to soak a cup of chole. I hadn't emptied the channa from its packet into a container whereas the mochai [ dry field beans] that was neatly stored in my brand new air-tight box caught my eye. A moments laziness and I substitued field beans for channa in my mind and there it was - Mochai Masala Rice! :)

Very Easy to prepare for a lunch, along with some raita and papad it tastes super delicious. I would recommend you to use kitchen king masala and not substitute with any other curry powder. This Kitchen king masala powder along with field beans is the hero of the dish. I sometimes combine kitchen king masala with garam masala for variety rice recipes and they work well too. In this dish though, the kitchen king masala and the green chilli flavor is unbeatable.

Ingredients

Serves - 3
Spice Level - Moderate
Prep Time - 10 min + 8 hrs soak time
Cook Time - 15 min

Field Beans/Mochai - a little less than 1/2 cup [ I used dry variety, Its called Val Dal in Hindi]
Basmati Rice - 1 cup
Onions - 1 sliced thinly
Tomato - 1 pureed
Green Chilli - 1
Ginger - 1 inch piece
Garlic - 2 cloves
Jeera/Cumin - 1 Tsp
Kitchen King Masala - 1.5 Tsp
Turmeric - a pinch
Salt - as per need
Hing/Asafoetida - a pinch
Dry Bay Leaf - 1
Cloves - 2
Chopped Coriander Leaves - 2 Tbsp
Oil - 1 Tbsp


How do you do it

1. Soak the field beans for 6-8 hrs in enough water. Pressure cook the soaked field beans for 1-2 whistles until they are soft but firm. Make sure they are not too soft that they get mashed later. Retain 1/4 cup water used to pressure cook the mochai, drain the rest.

2. Cook 1 cup basmati rice in 1.5 cups of water with 1 tsp salt. Spread the cooked rice on a plate to cool and drizzle a few drops of oil on it.

3. Grind coarsely without any water - ginger, garlic and green chilli. Keep aside.

4. Heat oil in a kadai/wok, add the hing, bay leaf, cloves and jeera. Let them roast and give out a nice smell. Add the onions and saute till translucent.

5. Add the ginger-garlic-green chilli paste and cook for a minute until the raw smell vanishes.

6. Add the tomato puree now and let it cook for 3-4 minutes.

7. Add the turmeric, kitchen king masala and 1 Tsp salt and stir well , saute for a minute.

8. Reduce to low flame. Add the cooked field beans now along with the 1/4 cup retained water and stir well so that its wrapped well with the masala.

9. Now add the rice and coriander leaves and mix well so the rice and field beans masala mixture combines well. Saute for a minute more. Switch off flame.

Yummy Mochai Masala Rice is ready! Enjoy!

Continue Reading >>

Tuesday, March 19, 2013

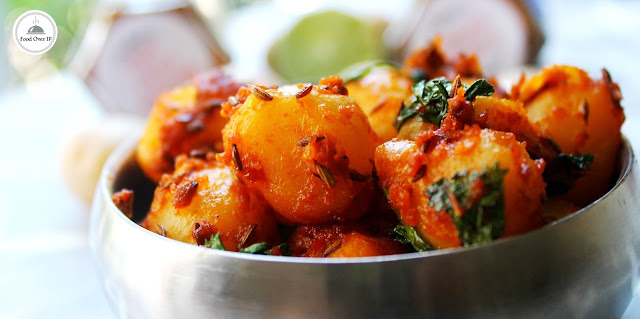
Spicy Baby Potato Roast

I started planning a hurried Saturday lunch menu and decided on the pulka-dal-jeera aloo [Indian Flat Bread/Lentils/Cumin flavoured potato] combo. Why hurried? you may ask but that's usually how my Saturday lunches happen. I have been insisting on minimizing having food outside and the weekends are a big hindrance to this mission. If we end up having lunch at home on Saturdays, we pretty much spend the day at home - that just happens. We start the day waking up quite late and I hurry to get something done before lunch and by the time we finish our lunch its well past noon and then its time for the afternoon slumber which can happen only on the weekends again, so you see how the story of my lazy Saturday goes? :-). So hopefully we can settle into a more active Saturday soon and also have lunch at home.

Now that I have rambled on like i always do, I shall get into the baby potato relevant talk now! So what started out as jeera aloo moved to jeera baby aloo and then I wanted some color for the potato, to be more precise, red color and hence came the spicy masala coated jeera baby potatoes :). The only time consuming activity is peeling the potatoes here, but after that its a breeze! Marinate the boiled baby potatoes in spicy mix and saute them in oil for a few minutes and we have a very spicy and moist flavorful potatoes ready to play with your taste buds.

Ingredients

Serves - 2
Spice Level - Moderate
Prep Time - 15 min + 30 min marination time
Cook time - 3-5 min

Baby Potatoes - 15
Tomato paste - 1 Tbsp or puree one medium sized tomato
Turmeric - 1/4 Tsp
Red Chilli Powder - 2 tsp
Garam Masala - 1 tsp
Coriander powder - 1 Tsp
Lemon juice - 1/2 Tbsp
Salt - as per taste
Oil - 1 Tbsp + 1 tbsp
Mustard - 1 Tsp
Jeera/Cumin seeds - 1 Tbsp
Hing/Asafoetida - 1 generous pinch
Coriander Leaves to garnish - 1 Tbsp


How do you do it

1. Boil and peel the baby potatoes until they are tender but firm. Do not overcook them, they will loose shape while you saute them later. So take care to boil them properly without it loosing its shape and collapsing. Its OK to under-cook it a little. With a fork poke a few holes into the baby potatoes gently. Keep aside.

2. Mix tomato paste [or tomato puree] with all the spices powders, salt and 1 Tbsp water. Pour this over the baby potatoes along with 1 Tbsp oil and wrap well so they are coated well. Let these rest for 30 minutes.

3.Heat 1 Tbsp oil in a pan. Add hing and mustard, when they pop add the jeera/cumin and let them roast giving an aroma. Add the marinated potatoes now and saute well in low/medium flame until the paste sticking to the potatoes cook well and all the flavors come together.

4. Check for seasoning , add more salt or spice powders if need. Adjust according to taste.

5.Switch of flame, add lemon juice and coriander leaves and mix well.


Serve with steamed rice or Rotis/Naan for a filling lunch!

Continue Reading >>

Sunday, March 17, 2013

Poondu Karuvepillai Thokku/ Garlic-Curry Leaves Paste for Steamed Rice


I am extremely fond of traditional South Indian recipes, my love for them just grows with each new dish I uncover. Garlic and curry leaves are two of my most favorite ingredients and surprisingly I have never made anything with curry leaves as the hero of the dish until now. I use curry leaves quite extensively, but just as a tempering element in all the dishes. When I stumbled on this video of Chef Damu making a Poondu Karuvepillai Kuzhambu [Garlic-Curry Leaves Paste], I wanted to try it almost immediately. And that is exactly what I did. All the ingredients mentioned in the recipe are a staple in an Indian Kitchen and you can make this thokku [Paste] as soon as you have finished reading this here on FoodOverIP :). The curry leaves puree added in the dish gives that brilliant thickness and unique flavor to the dish and along with Garlic, you have something very healthy!

If you are sighing about peeling garlic - use this tip on how to peel garlic within seconds and I am sure you will not put away of making Garlic based dishes anymore ;).

Other Garlic based dishes on FoodOverIP

Garlic Rosemary Focaccia
Garlic Shallots Curry
Garlic Rosemary Potato Wedges

Ingredients

Recipe Source - Chef Damu
Serves - 3
Prep Time - 15 min
Cook time - 15 min
Spice Level - Moderate

Garlic - 12-15 cloves peeled
Curry Leaves - 1 Handful
Tomatoes - 2 small or 1 Large, pureed
Onion - 1, medium sized, sliced thinly
Tamarind Paste - 1 Tbsp mixed with 1 cup water
Ginger-Garlic Paste - 1/2 Tsp
Red Chilli Powder - 4 tsp [adjust according to spice level]
Coriander Powder [Dhaniya] - 3 Tsp
Turmeric Powder - 1/4 Tsp
Dry Red Chilli - 2
Green Chillies - 2, slit lengthwise
Mustard - 1 Tsp
Urad Dal - 1 Tsp
Curry Leaves - 2 sprigs to temper
Oil - 2 Tbsp
Salt - as per taste

How do you do it

1. Saute the curry leaves in about a tsp of oil in a pan for a couple of minutes until they start to crisp. Cool and blend with 1/4 cup water in your food processor/mixer-grinder. Keep aside

2. Heat 2 Tbsp oil in a pan/kadai. Add the mustard and let them pop. Add the urad dal and let it roast. Add in the whole red chillies [ don't break them] and curry leaves and saute for a minute.

3. Add in the sliced onions and saute for 2 minutes. Add in the garlic, ginger-garlic paste and saute until the onions and garlic are cooked - about 3-4 minutes.

4. Add the tomato puree now, turmeric powder and let it boil for a couple of minutes. Add in the curry leaves paste made in step 1 along with the tamarind paste mixed with water and boil for 3-4 minutes on low-medium flame.

5. Add the red chilli powder, coriander powder, green chillies, salt and mix well. Cook until a thick consistency is formed and oil starts to float above the curry.

6. You can add water if you like a thinner consistency and boil for a few more minutes. Switch off flame.

This goes very well with Dosai, Idli and Steamed Rice. Enjoy.

Continue Reading >>

Tuesday, March 12, 2013

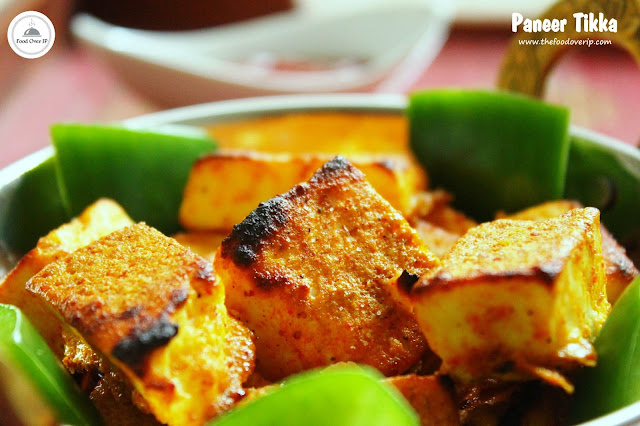
Paneer Tikka - Restaurant Style


One of the most happiest things about having moved to the US is the oven range in my kitchen :). It is with so much ease that I can make tikkas, cakes, muffins etc using this proper oven range. The OTG I used back home was just enough to get me started off with baking, grilling etc but I couldn't really do big things with that. For example, Paneer/Chicken tikkas never turned out that great in OTG's, they were quite dry and it took way too much time, and eventually I gave up trying to make the tikkas work in my OTG. The reason why I hadn't posted any kind of grilled Paneer/Chicken/Fish recipe here is primarily because I just wasn't satisfied with the outcome in my OTG.

But now that I have the full range oven that I had wanted for a really long time, we are going to see more of grilled stuff in FoodOverIP. The spice powders that make up the marination for the Paneer just tickled all the taste buds and you would cry for more of it with every bite :). I made this delicious Paneer tikka to pair with healthy Broccoli Parathas for a late Saturday lunch and it was the best lunch I had in the last few months!

Its an easy one if you have all the spice powders and yogurt, just mix up everything to coat the Paneer, rest it for a couple of hours, grill them for 5 minutes and you have Restaurant style Paneer Tikkas ready. I would recommend you to use all the spice powders and not miss any of them. They are the most important ingredients that make up for the taste and missing one-two of them would significantly modify the taste. Also if you have some marinade left, you could use some other veggie [I used mushroom] with it and grill them and have a great snack some other time. 

I forgot to add , I am a total "starter" person. I would just not be satisfied if I went to a restaurant and did not order any of the tikkas, kebabs :), so replicating these at home give me immense happiness. If you are like me, you should definitely try this one, they are irresistible :).

Ingredients

Recipe Source - Monsoon Spice
Serves - 2
Spice Level - Moderate
Prep Time - 5 min + 1 hr of resting time
Cook Time - 5 min

Paneer - 250 gm, cut into big square blocks
Oil - 1 Tbsp

For the Marinade
Thick Yogurt - 1.5 cups [ Recommended to use Greek or Hung curd, or normal yogurt but it should not be very sour ]
Tandoori Masala - 1 Tsp
Garam Masala - 1 Tsp
Coriander Powder/Dhaniya - 1 Heaped tsp
Amchur Powder - 1/2 Tsp or substitute with 1/2 Tbsp lemon juice
Turmeric Powder 1/4 Tsp
Kitchen King Masala - 1/2 Tsp
Jeera/Cumin Powder -1/2 Tsp
Red Chilli Powder - 1 Tsp
Sugar - 1 Tsp
Salt - 1 Tsp


How do you do it

1. Beat the yogurt well to get smooth, silky texture and remove any lumps.

2. Add all the spice powders, sugar, salt one by one and mix well.

3. Add the paneer pieces one by one and coat well. Refrigerate for at least 30 minutes. I rested it for an hour and it was perfect.


4. Take a cookies sheet and line it with parchment paper. Coat it with a tbsp of oil. Arrange the paneer pieces on it and grill with high setting for 2-3 minutes.

5. Take the cookie sheet out after 2 min, use a tong to turn the paneer pieces to the other side and grill for another 2 minutes until it crisps to a dark brown on the sides.

6. Alternately if you don't have an oven, use a big flat pan, apply some oil on it and toast the marinated paneer pieces on both sides.

Yummy Paneer tikka starter is ready. Enjoy. :)

Continue Reading >>

Sunday, March 10, 2013

Mushroom Egg Fried Rice - the Indo-Chinese way


One of my top easy recipes to pack for a weekday lunch would be some Indo-Chinese based Rice variety. On days when I feel lazy or forget to get some prep work done for the next day lunch, this is what I would do, chop up some veggies like mushroom, bell-pepper, carrot, throw in some sauces, mix it with basmati rice, and there my lunch is ready in minutes. So this Egg-Mushroom Fried rice happened on a day when I had to finish up the packet of mushroom in my stock and a red bell-pepper. Immediately the image of white rice with mushroom, red bell-pepper, scrambled egg and some greens popped into my head and I started wondering how colorful it would look to capture this on a photo :). It does look pretty doesn't it? Trust me, it tastes great too! So lets learn how to make this simple yet tasty Mushroom-Egg Fried Rice.

Ingredients

Serves - 2
Spice Level - Moderate
Prep Time - 15 Min
Cook time - 15 Min

Basmati Rice - 1 Cup
Eggs - 1
Mushroom - 10 button mushroom , sliced into medium sized pieces
Red Bell-pepper - 1/2 a piece,sliced thinly
Spring onion greens - 2 Tbsp
Onion [yellow/white] - 1 , sliced thinly
Ginger-garlic Paste - 1.5 Tsp
Green chilli - 1 , slit length-wise
Light Soy Sauce - 1 tsp
Green chilli sauce - 1 Tsp
Salt and pepper to season
Oil - 2 Tbsp


How do you do it.

1. Soak Basmati Rice in water for 15 min. Drain and cook with 2 Tsp salt and 1.5 cups of water. Once cooked, spread the rice on a plate and drizzle some oil on it, mix well and cool. The rice has to be cooled before mixing with the veggies for it to not get mashed up.

2. Meanwhile, heat a pan, drizzle some oil on it, break and egg into it. Add some salt and pepper on to it, scramble it well with a wooden spatula and cook until its done, about 2 minutes. Keep this scrambled egg aside.

3. Heat oil in a kadai, add the onions and saute well until they are cooked. Add the ginger-garlic paste and green chilli and saute for a couple of more minutes.

4. Add the chopped mushroom and bell pepper now and increase flame and cook until the veggies are half cooked and are crunchy.

5. Decrease flame now and add in the soy sauce and green chilli sauce and mix well. Also add a little salt, remember we have cooked the rice with salt already.

6. Add the rice now to the kadai, and mix well to combine everything . Saute on low flame for a minute or two, add some pepper powder, check for seasoning, add more salt if required and mix well.

7. Switch off flame now, add the spring onion greens and the scrambled eggs and give it a good mix with the rice.

Serve with any side dish of you choice or just with some tomato ketchup and chips.

Continue Reading >>

Wednesday, March 6, 2013

Broccoli Parathas


Broccoli Paratha is a recipe I had bookmarked a very long time ago and the regular habit is to bookmark and forget and that's what I did :).  Seeing Broccoli eeveryday at the vegetable shop reminded of this recipe and I had to make it. It called out to me I guess ;). I liked the thought of seeing a green colored stuffing inside the paratha and you can also get the healthy brocolli into your system as well. But I wasn't sure if they would taste great. So with some suspicion on that end, I went ahead and made them. To accompany these parathas I cooked some really awesome Paneer Tikka Masala just to be on the safe side, so that it can make up for the bad tasting brocolli paratha if that happend at all :). Looks like i dint need them after all. Brocolli Paratha by itself tasted super good and I am sure I would repeat this dish quite often.

I usually put away making parathas, I think it takes a lot of time, I am not an expert on them and until sometime back, I always had the stuffing oozing out issue while making parathas. This time though, I made really nice broccoli parathas and the stuffing stayed intact. I stayed extremely patient and gentle while rolling out the parathas and made doubly sure that the stuffing was dry and did not contain a lot of moisture. After rolling each paratha well, I would punch my fist into the air as a sign of victory, LOL. And eventually I discovered the trick to make parathas and I shall tell you how! :). So lets move on.

Ingredients

Recipe Source - Monsoon Spice
Serves - makes about 8 parathas
Spice Level - Moderate
Prep Time - 20 minutes
Cook time - 20 minutes

For the stuffing

Broccoli - 1 small sized, grated finely in your food processor
Green chilli - 1, finely chopped
Jeera/Cumin powder - 1/2 Tsp
Coriander powder - 1/2 Tsp
Amchur powder - 1/2 tsp or a tsp of lemon juice
Salt - as per need
Oil - 1 Tbsp

For the dough

Wheat flour - 2 cups
Water - 3/4 cup
Yoghurt - 2 Tbsp
Salt - 1/2 Tsp
Some wheat flour for dusting and rolling
Oil - for making the parathas


How do you do it

1. To prepare the filling, heat oil in a kadai. Add the green chillies and saute for a minute. Add the grated broccoli now and all the spice powders and mix well. Saute  for a couple of minutes until the broccoli release a little moisture. Switch off flame and cool completely. Do not stir fry this filling for long, then the mixture will contain a lot of moisture and the stuffing will ooze out while rolling parathas. Also make sure the filling completely cools before making parathas. Hot stuffing will cause the filling to ooze out of the paratha while rolling.


2. I make my dough in the food processor and this is what I do. The flour, salt, and youghurt is mixed well first. Then I pour in the water and run the processor until a smooth non-sticky dough is formed. You can use your bowl and hand to knead this dough as usual. Mix in the flour, salt and youghurt well. Then slowly add water while you knead to get a smooth surfaced non-sticky dough. Cover this dough with a damp tea towel and rest for 30 minutes.

3. The dough needs to be soft and smooth for soft parathas. So take care to get this right.

4. Remove the damp tea towel, take the dough and knead with hand once again and divide into seven-eight equal sized large balls. For parathas, the size of each dough ball needs to be quite big to accommodate the filling.

5. Dust this dough ball well in flour and using a rolling pin, roll into thick discs of 4 inch diameter.

6. Take 1.5 tsp of the prepared filling and place in center of the rolled disc. Gather the edges of the rolled disc and seal them. When you gather the edges of the rolled disc, the height of these edges must be at-least an inch above the stuffing, this is to make sure the filling will sit well inside. So bring the edges together and make them like a dumpling and seal well.


7. Use your rolling pin, gently roll over the sealed edge to flatten them. Once done, dust that surface with a little flour and roll into 1/2 inch thick parathas.


8. Heat a griddle on high flame. Move to low-medium flame once the griddle is hot. Place the paratha on the griddle now and cook on both sides until dark brown spots appear on them. Each paratha should take about 5 minutes to cook. Apply some ghee or oil on top of the paratha before taking it out of the pan.


Serve this super yummy Broccoli paratha with any side dish of your choice. We had this with Paneer Tikka Masala, watch out for the recipe soon :)

Continue Reading >>

Monday, March 4, 2013

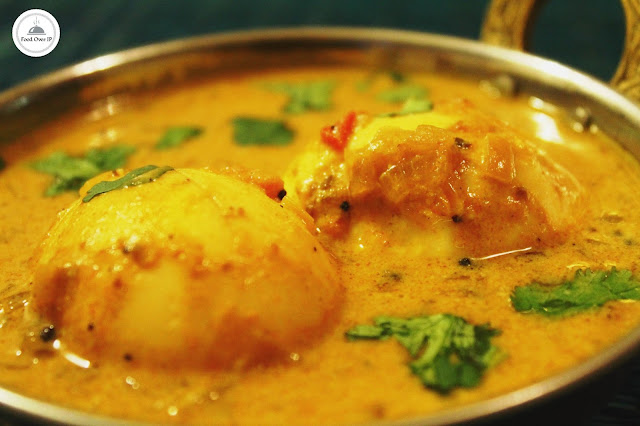
Egg Kurma | Eggs in coconut milk gravy


Egg curries are such a blessing when you don't have any veggies in your stock and want to make a quick dish. They pair up well with almost everything - rice, roti, dosais, idlis etc. I also make them when I need to escape for the chopping task :). I have always made the chettinadu version of egg curry, you can find it here - Chettinadu Egg Gravy, but this time I decided to make a different style, using coconut milk and it was a super hit. Boiled eggs soaked in spiced and tempered coconut milk are such a delight. We had it along with rotis and it was great. This recipe is definitely a winner for me.

Ingredients

Serves - 2
Spice Level - Moderate
Prep Time - 15 min
Cook time - 15 min

Boiled eggs - 3
Shallots/Sambar onions - 10, peeled and chopped well [If you are feeling especially lazy, go ahead and use 1 large onion instead :) ]
Tomato - 1 medium sized, chopped finely
Green chilli - 2, slit in half along the length
Ginger Garlic paste - 1 tsp
Turmeric powder - 1/4 Tsp
Curry powder - 1/2 Tsp
Cumin powder - 1 Tsp
Pepper powder 1 Tsp
Coriander powder - 1/2 Tsp
1 cup thick coconut milk [ I used canned coconut milk]
Mustard - 1 tsp
Cumin seeds - 1 Tsp
Curry Leaves - 1 sprig
Chopped coriander leaves - 1 Tbsp
Salt - as per taste
Hing/Asafoetida - a generous pinch
Oil - 1 Tbsp


How do you do it

1. Heat oil in a kadai and add hing, mustard, jeera, curry leaves and let them roast. Add the chopped onions and green chillies and ginger-garlic paste saute until they are cooked well.

2. Add the tomato pieces and turmeric and cook until the tomatoes are juicy and soft.

3. Add the curry and coriander powders and give it a mix and saute for a minute.

4. Add the coconut milk and 1 cup water, salt to the kadai now and reduce flame to low. Cook on low flame for 5 minutes and the let the gravy thicken. Add the cumin and pepper powder now and cook for 2 more minutes on low flame.

5. Taste to check seasoning and add more spices if needed. Add the chopped coriander leaves too.

6. Make 3-4 soft slits on the boiled egg and drop them in the curry. Cook for few more minutes. Switch off flame.

7. Pour the gravy on top of the eggs and let them soak in them for some time before serving.

Yummy Egg kurma is done, can be served along with Rice, Rotis or dosais.

Continue Reading >>
Related Posts Plugin for WordPress, Blogger...

A la carte!

Along with idli/dosai (13) Along with rice (32) Along with rotis (21) asparagus (1) baby potatoes (4) bajji (1) baking (9) banana (1) basil (1) basmati (2) beans (1) beetroot (5) bhindi (3) biryani (1) Black eyed beans (2) blueberry (1) bok choy (1) bottle gourd (1) bread (3) breakfast (4) brinjal (4) brocolli (1) buttermilk (1) butternut-squash (1) cabbage (2) cakes (7) carrot (1) carrots (3) cashews (1) cauliflower (8) cheescake (2) chettinadu (24) chettinadu delicacy (23) Chicken (7) chilli (1) Chineese (3) chinese (1) chocolate (1) chole (2) chutney (6) coconut (5) coconut milk (1) coriander (4) corn (1) cow-peas (1) cream-cheese (2) curry leaves (1) dal (3) dates (1) desserts (14) diwali 2013 (1) dosai (1) drink (1) drumstick (2) dry field bean (1) Easy (44) egg (3) fenugreek (1) fish (1) Food and Travel review (1) garlic (9) ginger (1) gobi (1) green gram (1) How To (5) Indian Flat Breads (4) indian sweets (3) International (5) ivy gourd (2) jeera (3) kootu (1) kovakkai (1) lemon (3) lentils (11) lobia (1) malai (1) mango (2) masoor dal (1) Methi (2) mint (2) mix veg (9) mochai (1) moong dal (4) mushroom (10) mutton (1) non-veg (2) onion (2) orange (1) paneer (11) parathas (1) pasta (2) peas (7) pepper (1) pickles (1) plantain (1) poriyal (1) potato (14) potatoes (2) quinoa (1) Rajma (1) rasam (1) rice flour (1) rosemary (2) shallots (1) snack (18) soup (7) soy chunks (1) spinach (6) stir-fry (1) strawberry (1) sweet potatoes (1) tamarind (5) tomato (7) toor dal (1) val bean (1) Variety Rice (13) walnut (1) wheat (2) yoghurt (1) yuuum!! (1) zucchini (2)

Latest on Food Over IP

Copyrights

All rights reserved @2012.

Unless otherwise mentioned, the text and images included in FoodOverIP blog belongs to the author. The blog author’s permission is required before any content is reproduced in any form.

  © Blogger templates The Professional Template by Ourblogtemplates.com 2008

Back to TOP  

Blogging tips